
Quick start
About 15 minutes. You need the app installed and a customer account you can log in with on your store (yours or a colleague's) to test.
The app home shows a Setup guide with five steps: Set up your program, Show the application form in your store, Show the member price on product pages, Show the membership in customer accounts and Add your first member. This page follows the same order.
Watch the walkthrough
A narrated, 4-minute walkthrough with English captions: the discount, member groups, membership length, the application form, the form and price blocks in the theme editor, customer accounts, applying and approving, e-mails, checkout, the member page, checkout rules, import and export, and plans.
1. Install and set the discount
- Install Lilya: Pro Program & Discounts. The app opens on the Free plan, which has every feature for up to 10 active members; you can change plans later.
- On the app home, select Open settings in the Setup guide.
- On the Discount tab, enter the member Discount (for example 15) and the Name shown at checkout (for example "Pro discount").
- Select Save in the save bar.
Saving creates the app's automatic discount in Shopify. You see it under Shopify admin → Discounts with the type Pro member discount. Don't delete or edit it there; the app keeps it up to date when you change settings.

Different discounts for different professionals
Want 25 % for instructors and 10 % for athletes? Create member groups now, before the first applications arrive, so applicants can pick their group on the form.
2. Decide how long memberships last
- Open the Membership tab.
- Choose Memberships last:
- A number of months from approval — 12 by default. A membership approved on March 5 runs until March 4 the next year.
- Until the same date every year (season end) — enter Season ends on (MM-DD), for example 06-30. Everyone renews at the same time.
- No end date — for trade accounts that stay until you cancel them.
- Optional: a Grace period in days, so members keep the discount for a few days after the end while they renew.
- Select Save.
3. Choose what the form asks
- Open the Applications tab.
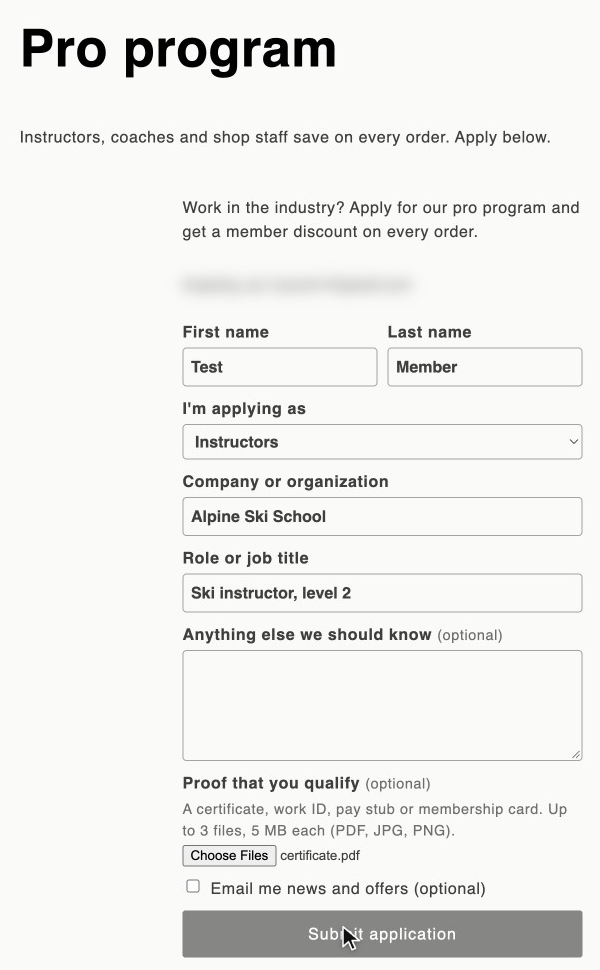
- For Company or organization, Role or job title, Anything else we should know and Proof document, choose Required, Optional or Don't ask. Name and e-mail are always asked.
- Optional: Email domains (optional) and Invite codes (optional) approve applicants automatically.
- Select Save.
On the Program page tab, write the Heading and an Introduction that says who qualifies and what members get.
4. Put the program on your store
Your program page is at /apps/pro on your online store (for example https://your-store.com/apps/pro). It works as soon as the app is installed. Choose one or both ways to show it:
- Link it from your menu. In the Setup guide, select Open menus, add a menu item that links to
/apps/pro(for example "Pro program" in the footer menu), save the menu, then select Mark as done. - Put the form on your own page. In the Setup guide, select Add form block. The theme editor opens on the default page template with the Pro program application block added. Pick the page template you want, then select Save in the theme editor. See The form on any page.
Optional, also from the Setup guide:
- Add block opens the theme editor on the product template with the Pro member price block: members see their price, visitors an invitation to apply. Select Save in the theme editor.
- Open customer accounts lets you add the Pro membership block to the customer account Profile page (Profile page › Add block › Pro membership › Save).
Shopify doesn't tell apps when a block was saved, so select Mark as done for each step you've finished.
5. Approve your first member
- On your store, log in as a customer and open
/apps/pro(or your page with the form block). - Fill in the form and select Submit application. The page says "Thanks — we received your application. We'll email you once it's reviewed."
- In the app, open Applications. The new application is under To review.
- Open it, check the Answers and any Proof files, and check the Member group.
- Select Approve.
The person is now on Members, with their discount and end date, and receives the Welcome to the program e-mail.
You can also add members yourself with Members → Add member, or bring a list with Import members (see Members and import).
6. Check the discount
- As the member, stay logged in and open a product. With the Pro member price block you see "Your pro price: …".
- Add the product to the cart and go to checkout.
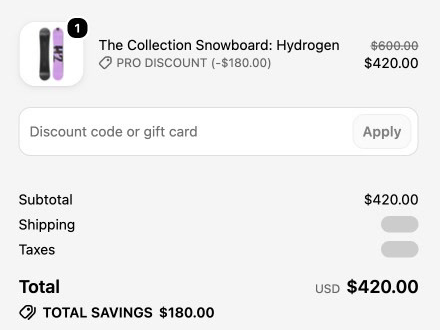
- The discount appears with the name you chose. In the example below, a member with 30 % gets "PRO DISCOUNT (−$180.00)" on a $600.00 snowboard.
Don't see it? Check that you're logged in with the member's e-mail, then follow A member doesn't get the discount.
Next steps
- Create member groups with their own discount.
- Adjust the member e-mails and their languages.
- Set an allowance, a minimum order or checkout rules.